How to Export Product Models from Blender for Web (glTF vs USDZ vs FBX)
Why exporting “for the web” is different from exporting for clients
When you export a 3D model for a client, you usually prioritize:
- compatibility
- editability
- correct scale
- correct materials
When you export for the web, the priorities shift hard:
- small file size
- fast loading
- materials that survive the export
- consistent lighting response
- works on mobile
A model that looks great in Blender can become a 60MB disaster online if you export the wrong way.
The 3 formats you’ll see most often (and why they matter)
For product models, these are the formats that show up again and again:
- glTF / GLB: best general-purpose web format
- USDZ: best for Apple AR (iOS Quick Look)
- FBX: best for interchange, but not ideal for web delivery
Let’s break them down in a practical way.
glTF vs USDZ vs FBX (quick comparison)
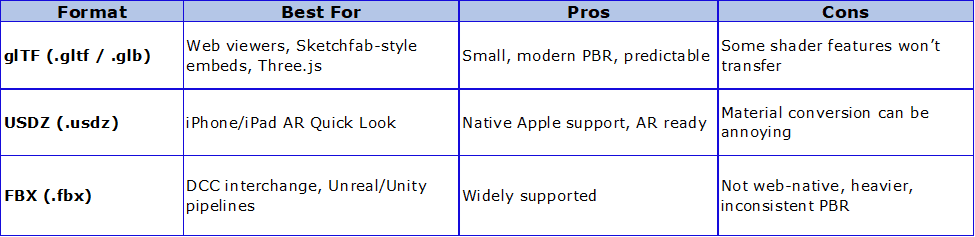
If you only remember one thing:
Use GLB for the web unless you specifically need USDZ for Apple AR.
Step-by-step workflow: Exporting a product model from Blender for web
Step 1: Clean your model (this affects file size more than you think)
Before export, do a cleanup pass. This is where most “my model is huge” problems come from.
Checklist
- Apply transforms: Ctrl + A → All Transforms
- Remove hidden objects
- Remove unused materials
- Delete unused images in the file
- Check modifiers (apply what you can)
- Check scale is realistic (meters)
Quick sanity rule
If your product is a watch, and it’s the size of a car in Blender, you’ll get weird results in AR and web viewers.
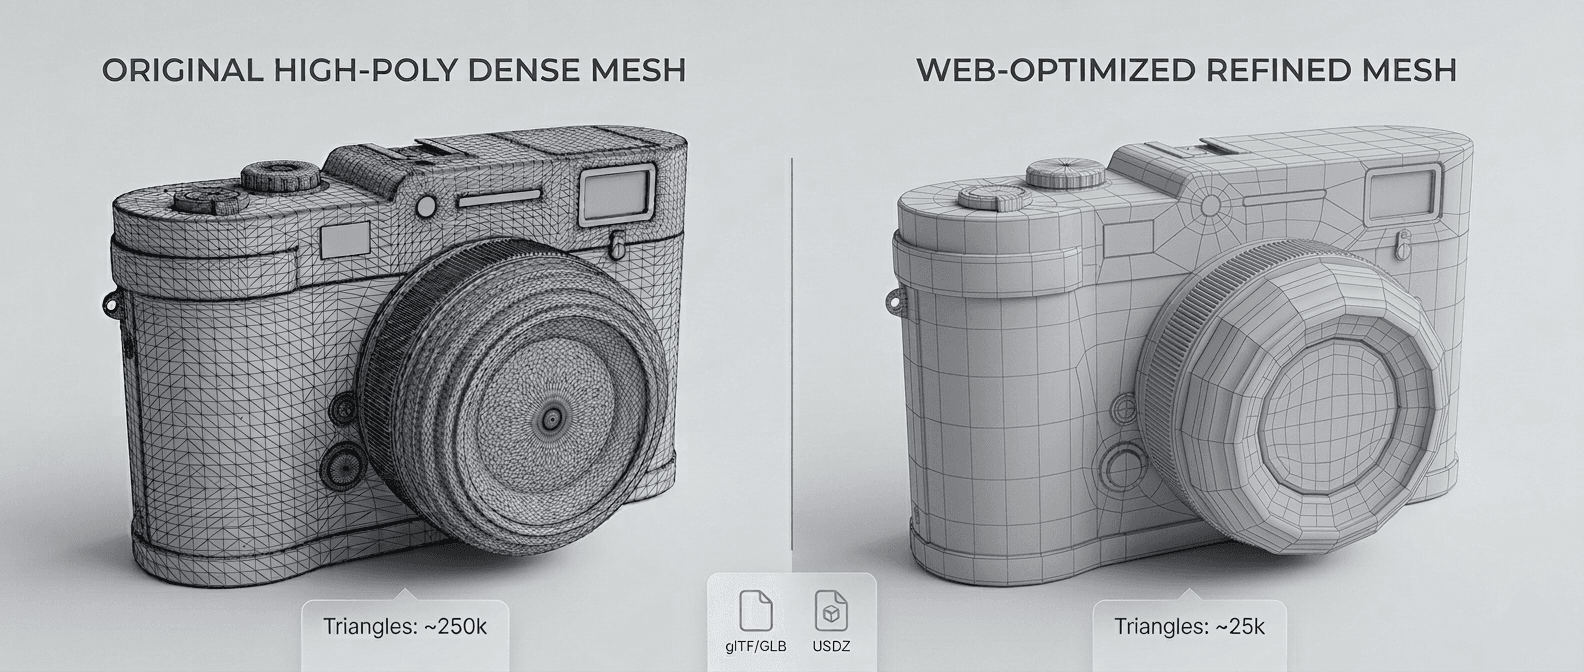
Step 2: Reduce geometry without destroying the silhouette
Web viewers don’t need your high-poly bevel stack.
For product previews, the best strategy is:
- keep the silhouette clean
- bake detail into normal maps
- keep bevels where they matter
Practical polycount guidance
- Small products (bottles, headphones): 20k–150k triangles
- Large products (furniture): 50k–300k triangles
- Anything above that needs a good reason
Tools
- Blender Decimate modifier (careful)
- Manual cleanup + dissolving edge loops (best)
- Weighted normals + bevel modifier (efficient)
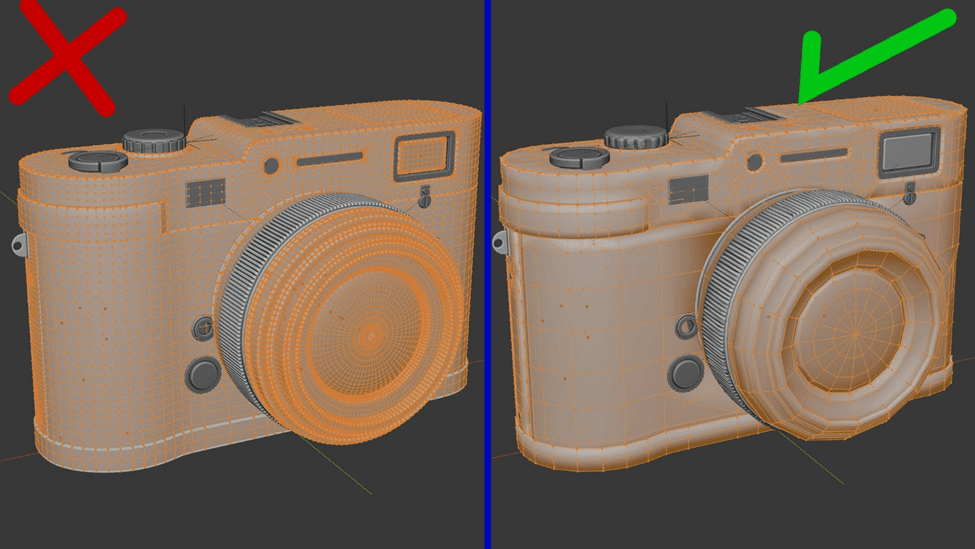
For web, silhouette matters more than micro-detail. Bake the detail and keep geometry light.
Step 3: Use web-friendly materials (Principled BSDF only)
glTF and USDZ do not understand Blender’s full shader system.
To avoid broken exports:
- stick to Principled BSDF
- avoid procedural textures unless you bake them
- avoid complex node setups
Safe maps
- Base Color
- Roughness
- Metallic
- Normal
- Emission (sometimes)
Step 4: Pack and compress textures correctly
Textures are usually the biggest part of a web model.
Recommended texture sizes
- 1K for most web previews
- 2K for premium portfolio closeups
- 4K only if the viewer supports progressive loading
Recommended formats
- PNG for clean export testing
- JPG for base color (if you need smaller files)
- WebP (if your pipeline supports it)
Step 5: Export as GLB (the best default)
GLB is just glTF packed into one file.
That matters because:
- it’s easy to upload
- it’s easy to embed
- it reduces “missing texture” issues
In Blender:
- File → Export → glTF 2.0
- Format: GLB
- Include: Selected Objects (recommended)
Export settings that matter
- Apply Modifiers: ON
- UVs: ON
- Normals: ON
- Materials: ON
- Images: Auto
- Compression: if available, use it
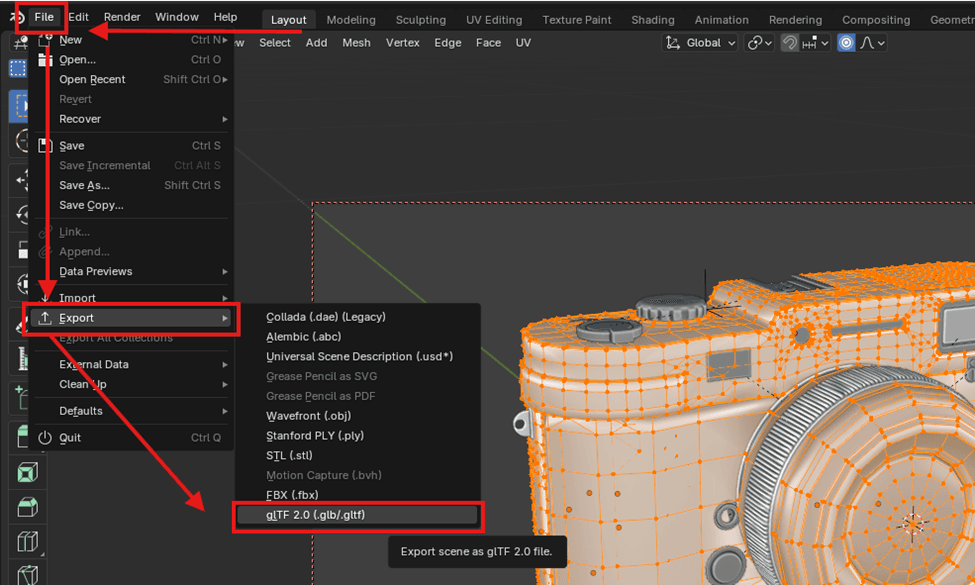
Blender’s glTF exporter is the most reliable way to get PBR materials into a web viewer.
Step 6: Export as USDZ (when you need Apple AR)
USDZ is mainly for:
- AR previews on iPhone
- product demos where the user places the object in the room
Blender does not always produce perfect USDZ results out of the box, depending on your version and your material complexity.
Practical advice
- Start from your clean GLB workflow
- Keep materials simple
- Avoid layered nodes and procedural effects
Reality check
If your client specifically wants AR on iOS, you will probably need to test and iterate. USDZ is less forgiving than glTF.
Step 7: Export as FBX (only when you need interchange)
FBX is still useful when:
- you’re delivering to Unreal or Unity
- you’re handing off to another artist
- the pipeline expects FBX
But for web delivery, FBX is usually the worst option.
Why
- materials don’t translate cleanly
- it’s heavier
- it’s not the standard format for web viewers
Recommended export settings (quick reference)
Best settings for GLB
- Export: glTF 2.0
- Format: GLB
- Apply Modifiers: ON
- Texture size: 1K–2K
- Materials: Principled BSDF only
- Keep file under: ~5–15MB if possible
Best settings for USDZ
- Keep textures small (1K)
- Avoid complex shaders
- Test on iPhone early
- Expect iteration
Best settings for FBX
- Use for interchange, not web
- Expect to rebuild materials in the destination software
Common mistakes (and how to fix them)
- Model looks fine in Blender but broken online
- Fix: Use Principled BSDF only, bake procedural textures
- File size is massive
- Fix: Reduce textures first, then reduce geometry
- Materials look flat
- Fix: Ensure roughness/metallic maps export correctly and lighting in the viewer is decent
- Normal maps look wrong
- Fix: Make sure normal maps are exported correctly and not being treated as color data
- USDZ looks different from GLB
- Fix: USDZ is stricter; simplify materials and test on iOS
Mini scenario: which format should you choose for a product portfolio?
Let’s say you have a portfolio site and you want interactive product previews.
A clean setup is:
- GLB for the website viewer
- USDZ as an optional “View in AR” button for iPhone users
- FBX only as a behind-the-scenes deliverable if needed
This gives you the best user experience and keeps your workflow sane.
For product models, the web workflow is mostly about discipline: clean geometry, simple Principled materials, and texture sizes that make sense.
If you want the best “it just works” option, export GLB and test it in a real web viewer. Only add USDZ when you specifically need iOS AR, and treat FBX as a handoff format rather than a delivery format.
About the Author: EFB Media
EFB Media is a 3D artist and content creator specializing in Blender workflows, product visualization, and realistic rendering. With years of experience creating digital art, they share insights and tutorials to help other artists master their craft.